Let's set the table together.

Inspiring moments and memories shared around The Table Together.

Filtering by Category: Knife Skills,Everyday Tips

Stocking the Bar Cart: Celebrating New Years with all the “Fixings"| Tuesday’s Tip of the Day!

Photo by Papereskimo 

Photo by Papereskimo 

When it comes to a festive New Year’s, its important to stock the bar cart with an element of sophistication while not breaking the bank – or countless hours of sleep. Today I offer my top tips for a fully stocked, festive and show stopping bar cart primed for your guests every wish.

Sips:

  • To keep things simple, offer a signature cocktail that is pre-mixed and only in need of a shake, stir or few ice cubes to finish. By streamlining the bar cart – remember, less is more – you minimize clutter and spillage all while keeping your costs down. If you would like to take your bar cart to the next level, keep a supply of the basics like prosecco, whiskey, brandy, vodka, and even sparkling cider from which your guests can choose from. While on the subject of sips, consider offering a hot cider or mulled wine for those looking to take off the cold chill from their commute.

Add-Ons:

  • Don’t forget tonic water, club soda and freshly squeezed orange juice or grapefruit juice as well! Bitters, cherries, orange peels, simple syrup…consider your options and have fun with it. Heck, pomegranate seeds for your prosecco is another simple and festive way to take ordinary to extraordinary levels.

Glasses:

  • Depending on available drinks, have a collection for glasses available for guests to craft their drinks in. Prosecco? Champagne flutes. Old fashioned? Rocks glass. 

Ice:

  • Use the right cube for drink. Crushed ice simply won’t do with your scant of brandy – plus it melts faster – in your rocks glass. P.S. don’t forget that ice scoop and bucket!

Napkins:

  • Always have cocktail napkins on hand. One way to help adorn the bar cart, is by using festive holiday themed napkins which are both useful and practical.

Festive Accompaniments:

  • From festive colored straws, umbrellas, fancy bamboo pics skewered with olives or cherries, or really whatever may suit your fancy, have a collection of stirrers and straws to adorn even the simplest of sips.

Equipment:

  • Cocktail shakers, stir sticks, strainers, muddlers, lemon or lime juicers, peelers…don’t forget the details because each and everyone make the difference in your overall success! 

Decorations:

  • A small vase of flowers, Glassybaby’s, bowls of gold and silver M&M’ – don’t forget the spoon – and even outlining the bar cart with fresh garland, you immediately take your cart to a whole new level with minimal effort.  

Now that you have a fully stocked bar cart, prepare yourself for an incredible evening as you cheer to 2016 and toast to 2017!

For other terrific tips and hundreds of recipes, visit my website (thetabletogether.com). While there, consider “subscribing” and I will send a new tip or blog post directly to your inbox every Tuesday and Wednesday morning!

P.S. Make sure you check out my YouTube channel, The Table Together with Tiffany Lewis, for dozens of videos solely dedicated to bringing all of these fantastic tips and recipes to life!

Cheers to starting a new tradition around The Table Together!

Sincerely,


Tiffany Lewis

Founder and true believer in the power of bringing people around The Table Together!


Holiday Baking 101: How to Create a Parchment Overhang | Tuesday’s Tip of the Day!

Come that time of year where stockings are hung, trees are adorned with ornaments and carolers are singing songs of holiday cheer and yule tidings, it’s time to dust off our favorite hand-me-down recipes for Grandma’s fudge and peanut brittle. Today, I am going to show you a super simple way to make your holiday bars and candies that much more rewarding with minimal waste and cleanup.

Step one:

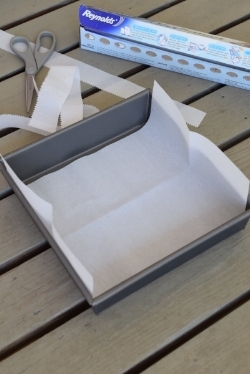
Using baking spray, like Pam Baking Spray, line the bottom and sides of your square or rectangular baking dish. Make sure you reach the corners as well! The baking spray will act as “glue” to hold your parchment in place.


110 T Holiday Baking 101 A How to Create a Parchment Overhang 01.jpg

Step two:

Using a pencil, trace the width of your baking dish while allowing a 2-inch portion hanging over the side. This is what you will hold on to when you neatly and gently lift the bars from the baking dish. Using scissors, trim the parchment paper making sure it fits perfectly width wise in the pan without any layover, bunching or creases on the side.  If there are creases on the side, the bars will take on that shape as the batter seeps between them using the crease as a mold during the baking process. 

110 T Holiday Baking 101 A How to Create a Parchment Overhang 02.jpg

Step three:

Repeat this step going the other way creating, also allowing a 2-inch overhang on either side. Now, both pieces of parchment paper should be overlapping on the bottom and reaching over on all sides.  If the parchment paper keeps rolling inside the pan, turn the parchment paper upside down as sometimes, depending on how the parchment paper was stored or rolled in the container, it naturally wants to keep rolling. In this case, I lay the parchment the opposite way it naturally wants to roll, think turning it inside out against the natural roll from the container it came in. 

Step four:

Add your batter and using an offset spatula, spoon or rubber spatula, smooth the top into an even layer. If the parchment paper keeps folding into the middle, hopefully you caught this under step three, make a crease at the overhang in the hopes the heavy crease will weigh down the sides helping to secure them where they belong.

Step five:

Bake or “set” according to recipe directions.

Step six:

If baking, allow the treats to “set” for 15 minutes before lifting. If you lift to early, and before the baked goods have had a chance to “set”,  they could break or crumble. When ready to lift, take hold of two opposing side’s handles and carefully lift. Transfer to a cutting board and allow to fully cool before cutting into desired size bars. 

For other terrific tips and hundreds of recipes, including numerous utilizing parchment overhang, like my Chocolate Pecan FudgePeanut Butterfinger Fudge, or even my Salted Chocolate Chip Cookie Bars,  visit my website (thetabletogether.com). While there, consider “subscribing” and I will send a new tip or blog post directly to your inbox every Tuesday and Wednesday morning! 

P.S. Make sure you check out my YouTube channel, The Table Together with Tiffany Lewis, for dozens of videos, including a tutorial on making the most delicious – and easiest – fudge ever, solely dedicated to bringing all of these fantastic tips and recipes to life! 

Cheers to starting a new tradition around The Table Together!


Sincerely, 


Tiffany Lewis

Founder and true believer in the power of bringing people around The Table Together!

Carving Turkey Like a Pro | Tuesday's Tip of The Day!

Yes, a grand 12 plus pound turkey can be intimidating as it’s big, hot, slippery and juicy, but before you hand over the carving knife and fork, let’s roll up our sleeves and do it together!

Carving Knife: First of all, a sharp carving knife and fork are essential! Sur La Table offers sharpening services year-round and sometimes even offers free sharpening services right before the holidays.

Cutting Board: If you don’t have a rimmed cutting board, consider placing a cutting board inside a large rimmed baking sheet which will catch the juices perfect for your gravy. Make sure you place a damp paper towel under the baking sheet to protect your counter and also to keep the sheet from sliding on the counter as you carve. 

Apron and kitchen towel: Carving a turkey can get messy, dress accordingly.

Rubber Gloves: If the turkey meat is too hot to touch, use clean (as in brand new and not the ones you use for washing dishes, uh-hum) kitchen gloves or double up on the throwaway (un-powdered) kind. This will help tremendously!

Carving: There are great videos on YouTube that offer step-by-step instructions on carving turkeys, but here is my verbal (and super easy) breakdown:

1.   Position the Turkey: First, cut the cooking twine and release the legs. Using a firm grip, rotate the legs away from the bird on either side to dislocate them at the hip. This will help stabilize the turkey and keep it from rocking back and fourth on the counter as you carve.

2.   Remove the Wings:  Cut in between the joint bones and remove the wings. You won’t find much meat on the wings but they are great in your stock!

3.   Remove the Breasts: Find the bone that runs straight down the middle of the turkey in between the two breast plates. Position your knife on one side of the bone and slant your knife blade away from the bone releasing the entire breast.  Transfer to a carving board, thinly slice (if desired) and repeat with the second side / breast.

4.   Remove the thigh and leg combo: use your knife to cut between the joint of the thigh and carcass (the area that you dislocated during step one). Repeat with the other thigh and leg combo.

5.   Make a Wish! Next, use a small knife to remove the wishbone which is located under the neck and at the very tip of center bone which separates the breast plates.

Servings Tips:

1.   When serving turkey, consider pre-slicing the meat (breast and thigh) and separating dark and white meat on the serving platter. Any remaining bones and even the carcass can be (and should be) saved for turkey stock.

For other terrific tips for cooking at your best, subscribe to my blog and I will send them straight to your inbox every Tuesday morning!

Cheers to starting a new tradition around The Table Together!

Sincerely,


Tiffany Lewis

Founder and true believer in the power of bringing people around The Table Together!

Segmenting Oranges | Tuesday's Tip of the Day!

As we embrace cooler weather and the bounty of citrus at our local farmer’s markets, finding ways to incorporate them throughout our weekly menu rotation can be daunting and repetitive. Quickly segmenting oranges and grapefruit of any variety is an excellent – and impressive – way to take any dish to the next level.

Follow these easy steps to segment citrus like a pro:

  1. Trim the bottom and top of each so that it can freely stand upright.
  2. Using a sharp knife, carefully trim away the peel going just deep enough to remove the pith while not wasting any of the fruit.
  3. Lay the orange or grapefruit on its side and using a small pairing knife, trace each segment by placing your knife just inside the membrane on both sides of the segment. Gently remove the segment with the tip of the knife. Repeat all the way around either holding the orange in your hand or on a cutting board (the safest option!).
  4. Once you have removed all segments, squeeze the leftover membrane (if appropriate) into a small bowl reserving the juice for a quick vinaigrette or even a sweet (pun intended) addition to a sauce or marinade.

For other terrific tips for cooking at your best, subscribe to my blog and I will send them straight to your inbox every Tuesday morning!

Cheers to starting a new tradition around The Table Together!

Sincerely,


Tiffany Lewis

Founder and true believer in the power of bringing people around The Table Together!