Perfect Pan-Seared Chicken | Tuesday's Tip of the Day!

There is nothing more delicious and satisfying than perfectly moist chicken breasts. Whether served as is, sliced and adorned on a classic Caesar or shredded and combined in a classic chicken noodle soup, knowing how to make a perfect pan seared chicken breast is one skill I highly encourage you master as it will take you so far! Now put that fear of chicken to the side and come join me in the kitchen! I have you covered with a video on my YouTube channel, The Table Together with Tiffany Lewis, recipes and lots of tips below!
Overcome your Fear!
- First and foremost, don’t fear the bird! Whether afraid of cross contamination, not cooking it long enough or fearful of cooking it so long it becomes rubbery and dry, chicken has, and continue to, paralyze many! Because of this, I dedicated a YouTube video on my cooking channel The Table Together with Tiffany Lewis to perfectly executed chicken and even have a quick and easy (plus straightforward) recipe for you.
Let's Talk Chicken Cutlets (Vs. Breasts):
- First of all, I like cooking with chicken cutlets because they are half as thick as chicken breasts therefore cooking in half the amount of time. Bonus, right?
- Because they cook so fast, you can usually cook the chicken on the stove top the entire time without worrying about the outside taking on too much color before the middle is cooked all the way through.
- The main reason many people have difficulty cooking an enormously thick chicken breast is because they are waiting for the middle to cook to 165ºF and try cooking the breast on the stove top the entire time. If this is you and you love chicken breasts, remove the meat from the stovetop as soon as you have the desired color, approximately 3 minutes per side. Transfer meat to a wire rack inserted into a baking sheet and pop in a preheated 400ºF oven allowing the center to cook until 165ºF on the dot. Remove from oven, cover with foil and allow to rest for 5 minutes.
- Because chicken cutlets cook so quickly, a mere 3 minutes per side, it only needs a few minutes to rest after cooking (ideally 4 minutes) putting dinner on the table in half the time!
Shopping for Cutlets!
- You can find chicken cutlets at most grocery stores, but if not, don’t be afraid to ask the butcher to do it for you!
- If you want to take a hand at this yourself, purchase chicken breasts (1 breast per your average adult). Using a sharp knife, slice them each in half horizontally resulting in 2 chicken cutlets half the thickness of the original chicken breast.
- From here, if you want them even thinner, transfer (working with one at a time) to a heavy duty ziplock bag. Using a heavy kitchen mallet or skillet, gently flatten until your desired thickness. I like mine 1/4-inch in thickness.
- In summary, each chicken breast will result in 2 chicken cutlets so when determining how many to purchase, think 1 chicken breast per your average adults, or two cutlets.
Let’s Get Cook’n:
- Place a cast iron skillet (ideally) or nonstick pan over medium – high heat. Allow to heat until hot, approximately 1 – 2 minutes.
- Meanwhile, generously salt, pepper (if desired) and oil both sides of each chicken cutlet. Make sure you generously oil them as there is no oil in the pan. The reason I oil the protein and not the pan is to ensure the entire protein is evenly coated and also so I don’t have to worry about oil gravitating toward one side of the pan. This also helps the oil from splattering when you add a cold protein to hot oil.
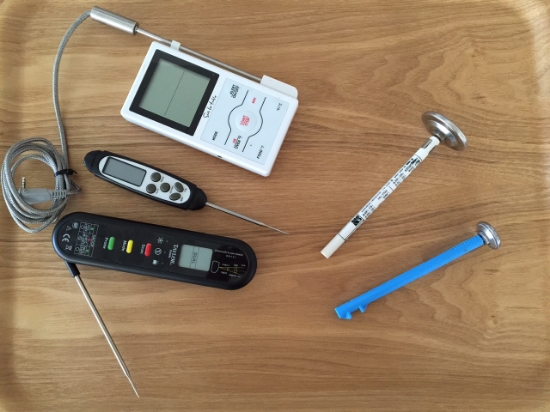
- Once the pan has heated (make sure you hear a sizzle when the chicken makes contact), place the chicken cutlets in a single layer presentation side down (the smooth “pretty” side) first. Cook until golden brown in color, approximately 3 minutes. Flip and cook the second side until also golden brown in color or when using an inserted meat thermometer, the temperature registers 165ºF.
- Transfer chicken from pan to a clean plate and loosely cover with foil allowing to rest for 4 minutes. Enjoy as is or slice or shred as desired!
- For the full recipe, make sure you check out my Weeknight Chicken Cutlet recipe on my website TheTableTogether.com. I even have an incredible Pistachio Crusted Chicken Cutlet recipe that you may just love!!!
For other terrific tips and hundreds of recipes, visit my website (thetabletogether.com). While there, consider “subscribing” and I will send a new tip or blog post directly to your inbox every Tuesday and Wednesday morning!
P.S. Make sure you check out my YouTube channel, The Table Together with Tiffany Lewis, solely dedicated to bringing all of these fantastic tips and recipes to life!
Cheers to starting a new tradition around The Table Together!
Sincerely,
Tiffany Lewis
Founder and true believer in the power of bringing people around The Table Together!