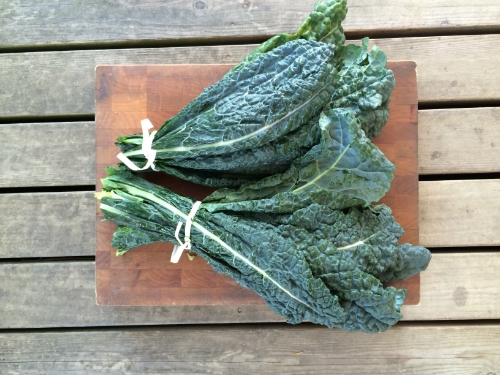
Let's set the table together.

Inspiring moments and memories shared around The Table Together.

Filtering by Category: Kitchen Hacks,Breakfast

Adding Rice to the Salt Shaker | Tuesday's Tip of the Day!

Don’t you hate when salt in your salt shaker gets lumpy? Me too! Here’s a little trick to prevent that (for salt shakers only!).

Add a few pieces of (uncooked) rice to your salt shaker and shake to evenly incorporate. The rice will absorb any excess moisture keeping your salt in tip top shaking shape.

For other terrific tips and hundreds of recipes, visit my website (thetabletogether.com). While there, consider “subscribing” and I will send a new tip or blog post directly to your inbox every Tuesday and Wednesday morning!

P.S. Make sure you check out my YouTube channel, The Table Together with Tiffany Lewis, solely dedicated to bringing all of these fantastic tips and recipes to life!

Cheers to starting a new tradition around The Table Together!

Sincerely,

Tiffany Lewis

Founder and true believer in the power of bringing people around The Table Together!

Pronto Chilling from Bubbles to Hot Soups and Stews | Tuesday's Tip of the Day!

Whether needing a quick chill for tonight’s toast, celebration or “just because” or wanting to safely cool hot stock or soup to room temperature before refrigeration, the following may be of prime interest!

Yes, you can “pop” (literally if it stays in there too long) your bottle of Veuve in the freezer for a few minutes with hopes of not forgetting or even higher hopes of those few minutes actually chilling it, or you can follow along the steps below:

  1. Chilling Bottles: From rose, whites, champagne, prosecco and bottles of soda or sparkling water, fill a large bowl (or sink) with plenty of ice and cold water. Finish with a handful of salt which keeps the ice from melting as it further cools the temperature of water. Submerge the bottle and in less than 10 minutes, you have an ice cold beverage ready for toasting!
  2. Chilling hot soups – stews – stock, etc.:
    • First, for a little food safety: Food must cool from 140ºF to 70ºF degrees in two hours, and must be cooled from 70ºF to 40ºF degrees in no more than four (Food Safety News). If this doesn’t happen, food is unsafe and should be thrown out!  Safety first folks!
    • Now that we have that taken care of, let’s start chilling:
      • Place a heat tempered container (metal pot or pan) in a sink full of ice cold water with a handful of salt.
      • Carefully add container so that water comes 1/2 way to the top.
      • While occasionally stirring, to further cool the core, allow contents to quickly cool to 40ºF before portioning into desired size containers and storing safely in the refrigerator.  If the container is too large or contents are taking too long to cool, consider dividing contents into smaller metal containers.
      • Make sure you label and date your contents before storing them in the refrigerator!

For other terrific tips and hundreds of recipes, visit my website (thetabletogether.com). While there, consider “subscribing” and I will send a new tip or blog post directly to your inbox every Tuesday and Wednesday morning!

Cheers to starting a new tradition around The Table Together!

P.S. Coming in the New Year (March 1), I am launching a YouTube channel, The Table Together with Tiffany Lewis, solely dedicated to bringing all of these fantastic tips and recipes to life! Stay tuned for more info to come…

Sincerely,


Tiffany Lewis

Founder and true believer in the power of bringing people around The Table Together!

Salting Water AFTER a Boil | Tuesday's Tip of the Day!

Your kids are hungry and dinner needs to get on the table in negative minutes! Been there? Haven’t we all! If you are turning to a quick weeknight pasta or mac and cheese, boiling water can feel like an absolute eternity, and yes it can take that! Follow these quick pointers for bringing your water to a roaring boil in half the time:

1.   Wait to Salt: They say to salt your water like the sea, but wait to do this until AFTER your water comes to a boil! Salt lowers the temperature of water taking it longer to boil. Who would have known!

2.   Lid it! Yes, this may sound obvious but pop a lid, sauté pan or baking sheet (whatever “safe” object you have) on top to trap in the heat allowing the water to come to boil in pronto speed putting dinner on the table in half the time!

For other terrific tips and hundreds of recipes, visit my website (thetabletogether.com). While there, consider “subscribing” and I will send a new tip or blog post directly to your inbox every Tuesday and Wednesday morning!

Cheers to starting a new tradition around The Table Together!

P.S. Coming in the New Year (TBD March 1), I am launching a YouTube channel, The Table Together with Tiffany Lewis, solely dedicated to bringing all of these fantastic tips and recipes to life! Stay tuned for more info to come…

Sincerely,

Tiffany Lewis

Founder and true believer in the power of bringing people around The Table Together!

Pomegranate Prep School | Tuesday's Tip of the Day!

Pomegranate seeds add a beautiful finish to anything from crostini to salads and even champagne! But how do we get to those gorgeous little rosy pearls? Before you reach for the clamshell of pomegranate seeds at your local grocery store, let me try to convince you how seeding a pomegranate at home is not only easy but fresher!

So with that, let’s Get Seeding!

1)   Slice the pomegranate in half then each half in half again.

2)   Next, there are two methods:

a)   Wooden Spoon Method:

i)   Over a bowl of cold water, use a wooden spoon to gently tap the peel of each section allowing the pomegranate seeds to dislodge and gracefully land in the cold water. The seeds will sink to the bottom and the pith will float to the top. Once all the seeds have been accounted for, simply use a sieve to scoop out the pith and your seeds are ready for storing, snacking or adorning!

ii)   Note: This method can splatter so make sure you wear an apron!

b)    Submerged Method:

i)   After cutting the pomegranate, submerge them under cold water. Using your hands, gently release the seeds one at a time. It will go faster as you get started. The pith will still float to the top as the seeds sink.

Now that you can seed pomegranates like a true culinary wiz, put back that clamshell and let’s get seeding!

For other terrific tips and hundreds of recipes, visit my website (thetabletogether.com). While there, consider “subscribing” and I will send a new tip or blog post directly to your inbox every Tuesday and Wednesday morning!

Cheers to starting a new tradition around The Table Together!

P.S. Coming in the New Year (TBD March 1), I am launching a YouTube channel, The Table Together with Tiffany Lewis, solely dedicated to bringing all of these fantastic tips and recipes to life! Stay tuned for more info to come…

Sincerely,

Tiffany Lewis

Founder and true believer in the power of bringing people around The Table Together!


Testing Egg's Freshness | Tuesday's Tip of the Day!

Ever peeked in the fridge only to see a container of eggs, no dates and not the slightest idea of when they were purchased? My hand is raised!

A quick way to test whether your eggs are still at their prime, is by placing them in a glass of water. Eggs that are fresh will sink to the bottom where older eggs will float to the top. 

And if nothing else, impress your friends with this new tip before whipping up your breakfast frittata! Next time, consider ripping the date from the carton and nestling it in the refrigerator with the eggs, or simple use a marker to write a quick date on top of each egg.

For other terrific tips and hundreds of recipes, visit my website (thetabletogether.com). While there, consider “subscribing” and I will send a new tip or blog post directly to your inbox every Tuesday and Wednesday morning!

Cheers to starting a new tradition around The Table Together!

P.S. Coming in the New Year (TBD March 1), I am launching a YouTube channel, The Table Together with Tiffany Lewis, solely dedicated to bringing all of these fantastic tips and recipes to life! Stay tuned for more info to come…

Sincerely,

Tiffany Lewis

Founder and true believer in the power of bringing people around The Table Together!

Segmenting Oranges | Tuesday's Tip of the Day!

As we embrace cooler weather and the bounty of citrus at our local farmer’s markets, finding ways to incorporate them throughout our weekly menu rotation can be daunting and repetitive. Quickly segmenting oranges and grapefruit of any variety is an excellent – and impressive – way to take any dish to the next level.

Follow these easy steps to segment citrus like a pro:

  1. Trim the bottom and top of each so that it can freely stand upright.
  2. Using a sharp knife, carefully trim away the peel going just deep enough to remove the pith while not wasting any of the fruit.
  3. Lay the orange or grapefruit on its side and using a small pairing knife, trace each segment by placing your knife just inside the membrane on both sides of the segment. Gently remove the segment with the tip of the knife. Repeat all the way around either holding the orange in your hand or on a cutting board (the safest option!).
  4. Once you have removed all segments, squeeze the leftover membrane (if appropriate) into a small bowl reserving the juice for a quick vinaigrette or even a sweet (pun intended) addition to a sauce or marinade.

For other terrific tips for cooking at your best, subscribe to my blog and I will send them straight to your inbox every Tuesday morning!

Cheers to starting a new tradition around The Table Together!

Sincerely,


Tiffany Lewis

Founder and true believer in the power of bringing people around The Table Together!

Pronto Whipping Cream by Hand | Tuesday's Tip of the Day!

When looking to make a quick whipping cream by hand – let’s say your hand mixer is already in use or you want to impress your guests – here is a quick way to whip up a batch without the electricity!

Place a metal bowl in the freezer with a whisk and allow them to get really cold. When ready, add the heavy whipping cream and whisk as fast as you can until soft peaks form. Add 1 tablespoon (give or take) of powdered sugar and vanilla extract (if using) and whisk again till medium – stiff peaks form.

At this point, you deserve two dollops of whipping cream for the effort. Don’t let me stop you!

Cheers to starting a new tradition around The Table Together!

Sincerely,


Tiffany Lewis

Founder and true believer in the power of bringing people around The Table Together!

The Key to a Perfect Omelet | Tuesday's Tip of the Day!

Confession…

A few months ago I was teaching a class on French cuisine. One of the dishes was a chevre fines herb omelet. More specifically, it was called “Perfect Omelet, Chevre Fines Herbs.” Now I have made many omelets in my days but teaching a class how to make an omelet, especially with the word “perfect” in the title, can be intimidating. Rightfully so! So I researched the key to a “perfect” omelet and came across hundreds of tips and You Tube videos showcasing different definitions of “perfect” omelets. At the end of the day, there are a few key “ingredients” that will whip up a perfect omelet like a true Frenchman!

  • Eggs: Have your eggs at room temperature!
  • Whisk: Whisk those eggs till they are frothy!!! This is the most important step! Whisking adds volume and volume produces fluffy eggs! Yes, it is as simple as that.
  • Salt (kosher): Just a pinch as you whisk.
  • Butter: Melt the butter in your pan before adding the eggs. Not only does this keep the eggs from sticking, it adds a delicious “rich” flavor profile. Plus, who doesn’t love butter!
  • Pan: Make sure you have the right amount of eggs for the pan so that it isn’t too thick or too thin.
  • Pan Temp: Medium – low heat, hovering closer to low than medium…no one likes brown crusty eggs! Adjust your heat accordingly and lift the pan for a quick “cool down.”
  • Texture: In France, omelets are traditionally a little “runny” in the middle and not cooked all the way through like we are used to here in the States. If you like it a little more “well done” but are worried about too much color as it finishes cooking, start it on the stove and finish in a 350ºF oven until desired doneness. This is also a great way to melt cheese if adding it on top.
  • The Fold: Traditionally, omelets are folded twice. The right side in, the left side in slightly overlapping securing any fillings inside, like cheese or veggies. Then again, it’s your omelet so make it as you please!
  • Fillings: All fillings should be cooked before added to the omelet. Meats & veggies won’t have enough time to fully cook before the eggs burn, so cook the add-ins in the pan, remove and set to the side and make the omelet in the same pan incorporating all those delicious flavors. Just make sure the pan cools a bit before adding the butter (if more is needed) and eggs.
  • Eating: As soon as it hits the plate!!! Bon Appetit

Now that you know the secret to making perfect omelets, I encourage you to get “crack’n” and make one! Pun intended!!!

Cheers to starting a new tradition around The Table Together!


Sincerely,


Tiffany Lewis

Founder and true believer in the power of bringing people around The Table Together!